A few people have mentioned my new Squeak a Comment logo, and I'd like to say thanks for giving me something to post about. It's so much easier when I don't have to think of a topic myself. I might cover reaction buttons too if there time, or maybe tomorrow.
A word of caution, don't attempt this if you haven't selected a layout. If you're using default settings I'm pretty sure your code is different.
A few posts ago I covered making a banner for you site using cooltext.com I used the same site for the post a comment message, because you can use a picture instead of just text. So I'm not going to go over all of that again, but if you need help go back and see this post. Just make the text a little smaller when creating your pic for comments. I used the same style and font so it would match the site banner.
...so anyways, take your picture and upload it somewhere. i used http://www.picturestack.com/ because it's easy and they keep your pictures indefinitely.
So, you got a picture uploaded with your new message? Good. Now lets put it in your blog. Log in to blogger, go to design, edit html, and check the box for expand widget templates, as seen here:
After you change that, hit the button for find next occurrence and change the second one too.
Once you've changed all the codes from <data:postCommentMsg/> to <img src='http://www.picturestack.com/878/814/octcooltext50yS7.png'/> then hit preview(you won't be able to see the change in the preview but just make sure you don't get any errors) and then hit Save Template and your done. You should have a nice new comments graphic/text thing.
You don't have to use an image, you can supposedly just replace <data:postCommentMsg/> with text that you want it to say, but i got errors when i tried to do that. your mileage may vary.
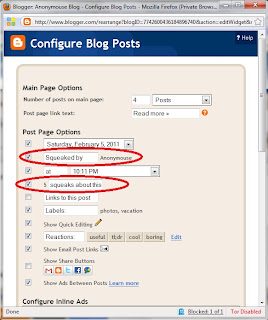
You may want to change your footer to match your new Comment entry text if you're doing a theme, like AnonyMOUSE making everything say squeak or whatever.
This is easier since I don't think you need to change any code to do it...
this'll bring you to a nice little popup where you can change these settings.
While you're there I might as well cover reaction buttons too. You see it a couple settings down in that last picture but theres a bit more to it than that. If you want these, go ahead and check the box, and/or click edit next to that setting to change what the buttons say. Now if you're using the default blog template, they should just show up, but if you have a custom layout its back to the html editor and expand widget templates(see above).
This time find the code: <data:post.body/> and immediately after it paste in the following code:
<span class='reaction-buttons'>
<b:if cond='data:top.showReactions'>
<table border='0' cellpadding='0' width='100%'><tr>
<td valign='center'><span class='reactions-label'>
<data:top.reactionsLabel/></span>
</td>
<td><iframe allowtransparency='true' class='reactions-iframe' expr:src='data:post.reactionsUrl' frameborder='0' name='reactions' scrolling='no'/></td>
</tr></table>
</b:if>
</span>


Your posts are always really informative and well thought-out. I don't really need this but I appreciate all the work you put in.
ReplyDeleteLove your background image by the way.
Great guide! Thanks!
ReplyDeleteAnother great tip, thanks for posting!
ReplyDeleteThese posts are very helpful which is obvious judging by their popularity. Keep it up!
ReplyDeleteHey, nice post, looking forward to the next ones. :)
ReplyDeleteI admire that you want to write it all for us :)
ReplyDeleteYes awesomely informative and useful.
ReplyDeleteLove those tutorials.
ReplyDeleteanother great informative post. great job.
ReplyDelete*squeak*
ReplyDeletefollowin^^
Nice, Gotta try this soon.
ReplyDeletegreat post, i really like your blogs, they are packed full of useful info
ReplyDeleteWorking day by day, step by step to make the perfect blog haha, good work man
ReplyDeletevery helpful if you want to customising your blog. thanks
ReplyDeleteNice thanks for the info
ReplyDeleteWonderful guide, I might do this!
ReplyDeleteHah, I was silently wondering about that. Thanks for the tip!
ReplyDeletenice post, very informative, cheers bro!
ReplyDeleteI think you have a knack for these types of posts
ReplyDeleteI'm gonna try this out right now. Thanks!
ReplyDeleteYou make really good tutorails dude. Please keep it up :D!
ReplyDeleteHa, very useful. Perhaps more work than I can put into it right now, but thanks
ReplyDeletegreat tutorial... will be adding this to my blog as well :)
ReplyDeleteSqueak squeak squeak.
ReplyDeleteMan more great info, I was wondering how people did stuff like that.
ReplyDeleteI was wondering myself about your "squeak" thingy. Thanks!
ReplyDeleteI should try this!
ReplyDeletealways enjoyr reading your posts. very helpful.
ReplyDeleteFollowing and supporting!
http://benny-lava.blogspot.com/
great stuff man.
ReplyDeletethats preety neat. im not going to do it but its cool.
ReplyDeleteThanks for the blog posts. When I have time, I plan on customizing my blog as well.
ReplyDeleteThanks for these!
Awesome Awesome Awesome!!!
ReplyDelete