I knew I'd be replaced by a machine eventually. I just didn't think it would be so soon.

Monday, February 28, 2011
Randomly Generated Posting
Sunday, February 27, 2011
What's On That Clipboard?
Today I ask all my readers to post whatever random thing is on their clipboard.
Saturday, February 26, 2011
Evil Captcha
So, I think my captcha is trying to get me to kill people. This is why you should turn captcha off on your blog.
Friday, February 25, 2011
Don't mess with Anon.
So I found this today and thought it was pretty great and wanted to share it on here...
Thursday, February 24, 2011
Wednesday, February 23, 2011
How to LOIC
Don't really know what to write about today, so I'm going to teach how to DoS a website using LOIC.
Tuesday, February 22, 2011
Happy Birthday Nailbunny
It's my friend's birthday today and I don't have anything else cool to write about for now, so today's post is going to be just for wishing her a happy birthday.
Monday, February 21, 2011
Save some money.
I went to the store today and saved a bunch of money so I thought I'd share the deals with my readers. To my knowledge, these only work in the US, so i apologize to my foreign readers.
Sunday, February 20, 2011
Saturday, February 19, 2011
Paypal Buttons Revisited
A couple people have asked me how to make it so paypal will not show your email address when you use a donation button on your blog/site. So in response to these questions, here's how.
Thursday, February 17, 2011
Samsung Epic First Impression
I got a new phone today, a Samsung Epic. First thing I did was root it and install custom firmware and so far it's working out great.

Wednesday, February 16, 2011
Encryption Pt. 2 (hidden volumes)
Yesterday I covered basic file encryption, and it got some good responses. So today I'm doing a follow up with some slightly more advanced features in truecrypt.
Tuesday, February 15, 2011
Encyption Pt. 1 (File Containers)
Ok, I've been saying I'll post something on file encryption for a few days now, so I'll get started with a pretty basic way to do things that should work well in most situations. I titled this "part 1" because I may do a "part 2" on some more advanced ways to do things, but I'm not sure yet.
Monday, February 14, 2011
Sunday, February 13, 2011
Security Tips
I've posted all the useful blogger tutorials I can think of, so I was thinking about branching out and writing some tutorials about other computer/IT subjects. I just got a new 1tb hard drive for my birthday and the first thing I did with it was encrypt it (which took 38 hours, but 1 tb is a lot of space). This gave me the idea to write a tutorial on encryption and security. So I'll put that up soon if there's any interest. I would do it now, but I'm not done yet.
Saturday, February 12, 2011
Happy Birthday Self
Today is my birthday, so instead of making any kind of meaningful contribution to this blog, I'm just going to post a couple of youtube videos on the subject of birthdays or whatever.
Friday, February 11, 2011
My Friend Rick
Once again I don't have much to say, so I thought I'd let my friend Rick have a word with you. Here's what he has to say.
Thursday, February 10, 2011
Pop Goes the Comment
Yesterday I was asked how make comments appear in a smaller, popup window, so today I'll cover that. It won't make for a very long post but I'm always happy to answer questions, so keep em coming if anybody has anything else they want to know.
Wednesday, February 9, 2011
Adsense 101
Well here I am again with not much to post about, so I'll just answer a question from yesterday. I was asked "could you do a tutorial on adding the ads to the bottom of the page because I don't want them in my face when I'm commenting and I would like a sleek look." Many of you probably know this already, but for those who don't I'm always happy to answer questions.
Tuesday, February 8, 2011
After the Break
Want to make your blog load faster? Want to help your followers who have a slow connection or are opening up 50 blogs at once? A couple people have asked me how to make a blog display an intro paragraph with a link to read the full post, and I think it's a great idea for a tutorial. It's also really easy. Click to read how.
Monday, February 7, 2011
Clearing Things Up.
I'm feeling kind of lazy tonight so just a quick tutorial on making the background to your posts invisible, so it doesnt block the view of your blog background...
Sunday, February 6, 2011
Squeaking my Mind.
A few people have mentioned my new Squeak a Comment logo, and I'd like to say thanks for giving me something to post about. It's so much easier when I don't have to think of a topic myself. I might cover reaction buttons too if there time, or maybe tomorrow.
A word of caution, don't attempt this if you haven't selected a layout. If you're using default settings I'm pretty sure your code is different.
A few posts ago I covered making a banner for you site using cooltext.com I used the same site for the post a comment message, because you can use a picture instead of just text. So I'm not going to go over all of that again, but if you need help go back and see this post. Just make the text a little smaller when creating your pic for comments. I used the same style and font so it would match the site banner.
...so anyways, take your picture and upload it somewhere. i used http://www.picturestack.com/ because it's easy and they keep your pictures indefinitely.
So, you got a picture uploaded with your new message? Good. Now lets put it in your blog. Log in to blogger, go to design, edit html, and check the box for expand widget templates, as seen here:


You don't have to use an image, you can supposedly just replace <data:postCommentMsg/> with text that you want it to say, but i got errors when i tried to do that. your mileage may vary.
You may want to change your footer to match your new Comment entry text if you're doing a theme, like AnonyMOUSE making everything say squeak or whatever.
This is easier since I don't think you need to change any code to do it...

this'll bring you to a nice little popup where you can change these settings.

This time find the code: <data:post.body/> and immediately after it paste in the following code:
<span class='reaction-buttons'>
<b:if cond='data:top.showReactions'>
<table border='0' cellpadding='0' width='100%'><tr>
<td valign='center'><span class='reactions-label'>
<data:top.reactionsLabel/></span>
</td>
<td><iframe allowtransparency='true' class='reactions-iframe' expr:src='data:post.reactionsUrl' frameborder='0' name='reactions' scrolling='no'/></td>
</tr></table>
</b:if>
</span>
I put my code a little further down it looks like but I don't recall why...anyway, here's mine so make yours look something like this:

Preview to check for errors, save it and you're done. That concludes this post because I really don't feel like writing anymore. I hope this helps somebody out. It's not too difficult and I did my best to break it all down into manageable steps without making this post too long. Let me know how it works for you if you try it. I know it might seem like a lot but I covered a few different mods so...get what you can out of it.
Saturday, February 5, 2011
Stumbling in the Right Direction.
This is sort of a follow up or correction to my last post about StumbleUpon. I'm still new to blogging and while the method i discussed yesterday does work, this way is better. A couple people asked about other buttons like reddit, and similar services. This handy trick should cover all services in one fell swoop and hopefully we'll all get even more traffic!
So apologies to anybody who used yesterdays method, you can leave it there or just go back and remove that line from your code. Lets get to it. I haven't even tried this out yet, so I hope things go according to plan, as I know sometimes putting these things in a gadget can reduce functionality.
1.) Log in and go to design then add a gadget:


That URL is for a post, not the main blog! So this gadget rocks, and it's easy to add! Now I just gotta make accounts for some of these services so I can submit my pages and get people "liking" em. Just made a technorati acct and they want me to put the code: ESWAZ7P9PXFW into a post, so just ignore that. :)
This is probably enough for one post, but you see those reaction buttons at the bottom of my posts now? If you don't know how to add those, I'll cover that in tomorrow's post if there's any interest in the subject. I thought they were cool.
Enjoy the extra traffic sources!
Friday, February 4, 2011
Stumbling along.
A good way to get some extra traffic to your blog is a site called "stumble upon". Stumble upon lets users input keywords and then takes people to a random site matching those keywords. So if somebody was interested in weblog tutorials or chemistry, theres a chance it would take that person to my blog, because i have posts that were submitted to stumble upon, with those keywords.
Before I get to that though, somebody asked me how to make comments appear in a popup window. So i'll run through that real quick. Log in, go to Settings, comments, look for the setting for comment form placement and set it to popup as shown below:

Moving on, creating an account with stumbleupon is pretty straightforward, so hopefully you can all get through that without helpful screenshots. Just go to http://www.stumbleupon.com/ and click the big button that says "Join for free" and fill out a short form.
Once you have an account it's time to add their code to your site, so it'll work with your blog. I like to put it in the footer like this:

Some people embed it in their posts, but that looks kind of sloppy to me, but if you know basic html you can play around with it's placement a bit and find what works for you. If not, here's how to set it up the way i did mine. Log in to blogger, go to design > edit html, and click expand widget templates as seen below.
Once you've done that, you'll see a bunch of nonsense in the window below that, so just hit ctrl+F to do a search. Type in postquickedit (if you get multiple hits, the one you want is below where it mentions "quickedit pencil" but it should be the first result). Create a new line below the one that mentions postquickedit, and paste in: <script src='http://www.stumbleupon.com/hostedbadge.php?s=3'/>
Your code should now resemble this:

I should mention that the code I'm using is for the button style I currently use but there are different styles. I think this one looks best in the blog footer but if you want something else you can change where it says s=3 to another number from 1-6. i might try s=2, because i like that style button too.
When you're done click preview to make sure you dont get any errors and to see how it'll look.

You can see I changed it to s=2 so when i hit preview I see the new style at the bottom of a post:

For reference I'll inclue a pic of what buttons correspond to the different numbers in the code.

The number displayed next to the SU logo is how many people like it or recommend it. The higher the number, the more chance you have that your blog will get stumbled to. At first though, the badge won't have a number, it will say Submit. You(or somebody else) has to submit the page to stumbleupon by clicking the button.
Note, on your blog homepage, all of these will submit your blog homepage. When you click on an individual post, then you can submit that post. Always double check the URL you're submitting to make sure it's just the link for your post and not a link to a comment or anything like that.for example when i go to my january archive i see:

When you click submit, you'll be taken to a page like the one seen below where you choose relevent keywords and if it's safe for work and then it gets added to their database.


Results:

If you feel this post is unclear or need additional assistance, or run into any problems, just let me know in the comments and I'll help out if I can. Let me know if you guys like this or found it helpful.
That's all for now. See ya next time. :)
*******************************************************************************
EDIT: ugh, this post is now useless. sorry everybody who already put it in. this method does work, but i just found a better way to do things...i'll post it in tomorrow's update which should go up at midnight CST. I still have some things to learn myself... so if you were thinking about doing this, don't; wait for the next post for an easier solution with more features.
I've only been blogging for a couple weeks so i don't know all the tricks yet. *Squeak*
Thursday, February 3, 2011
Another Whiteknight Post!
Anonymouse Blog is filmed live before a studio audience...
On today's show we'll cover interior decorating! OOH! AH!
Umm a few people have asked me to go over some tips for tweaking the way a blog looks, so I'll cover some basics of that, maybe change/improve mine a little bit as I go. We'll see how long this gets and maybe I'll make a part 2 or something if there's enough interest in it. I have more helpful tips for getting more views to your blog too, but that post keeps getting pushed back as I get requests for things and try to help out. So lets see what happens here...
Ok, first up I guess I'll cover simple banners. Why use plaintext for your blog title when you can have it in 3d or glowing green or something. If you have leet photoshop skills feel free to skip ahead but I'm personally too lazy for that so go to a site like http://cooltext.com/ and you can generate a neat banner with your blog name. This is pretty easy to do, just click on a banner style, i chose "nova" and then change the text and colours if you want as seen below. click render when you're done.

This will take you to a page where you see your new banner and under it a link titled Download Image. Click the link and save it somewhere. Then hop over to blogger, log in and follow along with this pic to go to Design and click edit for the header thing.

This should take you to the following screen, where you should click browse,select the image you just created, set the setting to "instead of..." and click save. See pic if you get lost:

Hmm I liked my old one better...oh well, i'll fix it later. That was pretty easy though right? I don't really feel like doing this right now, but I'll cover a few more basics now and then see how I feel maybe do some more stuff with it tomorrow. Also keep in mind the size of the banner you create, I had to resize mine in paint, but that shouldn't be too hard for you guys. If you need help let me know.
Ok, some other random tweaks. Backgrounds are easy. Fire up your favorite search engine; I use bing or google, and do an image search for something related to your blog or just something shiny and pretty, whatever. save it. and go to the design tab and click template designer:

forgot to circle it in paint but i'm too lazy to fix that...moving on. I don't even know what to make my background so I'm just going to keep the current one and reupload it. (EDIT: just changed mine, thanks to http://epicwallpapersandart.blogspot.com/ for the new one.) first off when you get to template designer, pick a template that goes with the general color scheme you want to save yourself some work.

then go to the background tab/button/thing on the left...Click that part where it says none and then you can browse the default choices or click upload to upload the one you just downloaded.

The scroll with page option (see below) determines what happens when users scroll down your page, does the background appear fixed or can they scroll down in the background too. set it however you want.

then click apply to blog in the upper right corner and you have a shiny new background.
Ok, that's the basics. If you want more on this subject I can follow this up with more tomorrow, or you can play around with it yourself and try tweaking little things like font colours, just don't use anything hard to read. If most of you know how to tweak your settings already I'll go on to posting some other more helpful tips for everybody.
I feel like this stuff is pretty self explanatory but I know some people wanted me to go over it, so I don't mind helping those few who asked. Feedback is always appreciated.
So tune in next time and i'll be back with some more umm...words and pictures! Same great time, same great channel, and now a word from our sponsor...

Wednesday, February 2, 2011
helping CoDgirl with her comments.
it could be a setting but i doubt it is. i noticed your problem and thought it was just me at first.
check these settings, make sure they match up with this:

if that doesnt fix it and i'm guessing it won't try this move: go to the Posting tab, then edit posts, click edit next to one of them.

at that screen, underneath where you see the post typed out, click Post Options, make sure reader comments is set to Allow:

if this still doesnt help you let me know and i'll edit it or review other setting with you. this would be easier over some sort of im client though, let me know what you got and you can im me.
I Guess People Like Blog Tutorials...
My last post got mostly positive comments so I guess I'll give some more tips. I'm thinking this time I'll cover paypal donations, and the top 10 followers gadget. Both are pretty easy to add. So get ready for my l337 MSpaint skillz.
For the a neat gadget that lets you keep track of your top 10 most active followers, log in to Blogger and go to to the "Design" tab. Click on "Add a Gadget" as seen here:

in the window that pops up, click on "Add your own" like this:

Copy and paste: http://xmlgadgets.com/ig/top10.xml into the form. and then click Add By URL.

Title it whatever you want and click save and you're done. Easy right? Ok, let's tackle paypal next. I got my first donation just the other day which I'm very thankful for. So set up a paypal acct, if you don't have one, and log in if you do. In the bar at the top, click Merchant Services, and then under the section for Create Buttons, click on Donate. See pic for reference:

This will take you to the form for creating the button. You can customize it if you want, even use your own image for the button(which i considered) but paypal has good brand recognition, so lets stick to the default for now. All you really need to enter is your organization name/service. Just use the title of your blog, and you can change other settings if you want.

Click on "Create Button" and you'll be taken to a page with some freshly generated code. See?

Select it, press ctrl+C to copy it. Now we log in to blogger and go to Design and Add a Gadget (see first pic), but this time we're going to select HTML/Javascript. So scroll down and look for this(click the plus sign):


I got at least one more helpful little blogger tip up my sleeve but I think I'll save it for tomorrow. This seems lengthy enough for today. Or I could go back to posting random explosives and weapons and junk if you guys prefer...feel free to let me know in the comments. If you found this useful or anything drop a comment about that too, it helps me feel validated. :)
Thanks for following.
Tuesday, February 1, 2011
Captcha and FavIcons.
Ok, some more random tips for bloggers. These probably won't be as useful as my last post about add-ons and stuff, just a couple of things that I learned recently that I think helped my site look a little better. You might know some of this already, or maybe not, but hopefully it'll help somebody.
First things first. Some of you still have captcha on your comments. Unless your blog is hugely epic, you really don't need it, you aren't going to get spammed by bots. Here's how to turn it off. When you log in, go to Settings, then Comments.

Scroll all the way down, and you should see this. Make sure it's set to no.

Ok but that's basic, lets get into some cooler stuff. How about changing the favicon... A favicon is the icon that shows up in a tab or in a bookmark menu, that makes your site stand out a little bit more than the ones that just have the blogger logo. Example:

I'll set myself up with a new one and take screenshots of the process, so you can see how it's done.
First you can use any pic you want and generate a FavIcon and animated FavIcon at this helpful site here: http://www.chami.com/html-kit/services/favicon/
Just click Browse and then select a pic as seen below:


It'll give you 2 icons, one of which is animated! Click to download.

This will give you a .rar file with the icons in it. I'm writing this to cater to inexperienced people but its getting long so i'll assume you know how to extract a rar file. No screenshots for this. Winrar is free to download, and pretty easy to use. If you need help with it, let me know in the comments and I got you covered.
Now blogger doesn't support .ico files so you'll need to upload them to a free file hosting service. There are plenty out there. I'm going to use fileden.com (even though it has some annoying ads) but feel free to do a google search for other ones if you like. Whatever site you choose create an account(if required) and upload both the animated gif and the icon file that you just created.

Now to add them to your blog. Log in to blogger and go to the design tab and select edit html:

Press ctrl+F and type in /head. right above the </head> tag, pase in the following code but change the address to reflect wherever your files are hosted, you can see one of these is for the animated gif, and one is for the standard icon:
<link href='http://www.fileden.com/files/2011/1/30/3070528//favicon.ico' rel='shortcut icon'/>
<link href='http://www.fileden.com/files/2011/1/30/3070528//animated_favicon1.gif' rel='icon'/>
So it should look like this:
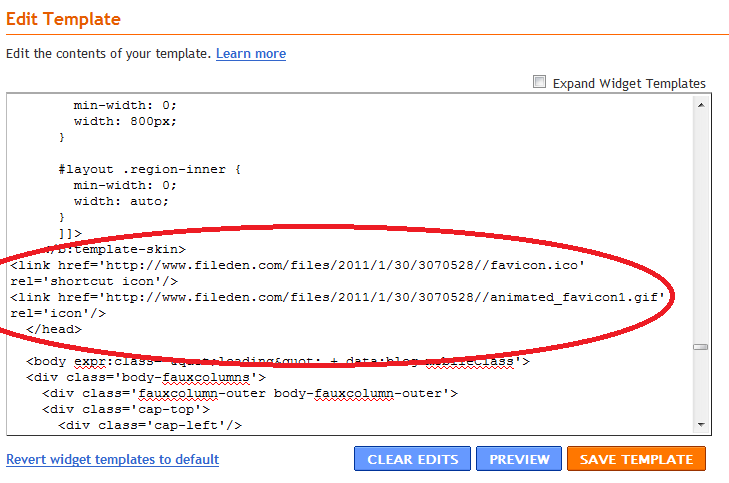
Click the 'Preview' button, to make sure you don't receive any errors, and if all goes according to plan, click 'Save Template' and the next time you refresh your page. You'll have a brand new FavIcon! Neat huh?
Umm, at the time of this writing file den is having some problems, so even though my screenshots are from there, i actually used mediafire.com and i kind of prefer it, so maybe try that out. It seemed to work ok for me.
When you finish all this, you should end up with something like: you see in this pic:

I was going to cover adding a paypal donation button as well, but I think this has gotten long enough so I'm going to end it here. I'll probably do the paypal button for tomorrow's post. Any feedback would be appreciated. Am I simplifying things too much and making it too long, do you need any more help or advice on some aspect, was this at all useful or helpful to anybody? Comments are always appreciated.
EDIT FOR IE9: the IE9 beta (and likely some other browsers) don't seem to support animated .gif favicons very well if at all. so point both of the above links to your .ico file to fix this. I changed mine and they seem to be working better in all browsers, except for some reason in chrome. IDK what's up with chrome.
Subscribe to:
Comments (Atom)